Beethoven Software Stack
One of the goals of Beethoven is to provide a uniform deployment and testing process across platforms: Using an accelerator on a Zynq board should work the same as on AWS F2 and in our simulation platform. ChiselTest and Verilog testbenches are excellent for unit-testing your modules, but are cumbersome for large-scale, end-to-end testing on real datasets.
Along with the Beethoven Hardware library, we've published a software integration stack that supports simulation and device backends, allowing you to test the exact same software binary in simulation before you deploy it. Our simulation backend supports multiple simulators: Verilator, and simulators that support VPI (e.g., Icarus Verilog, VCS).
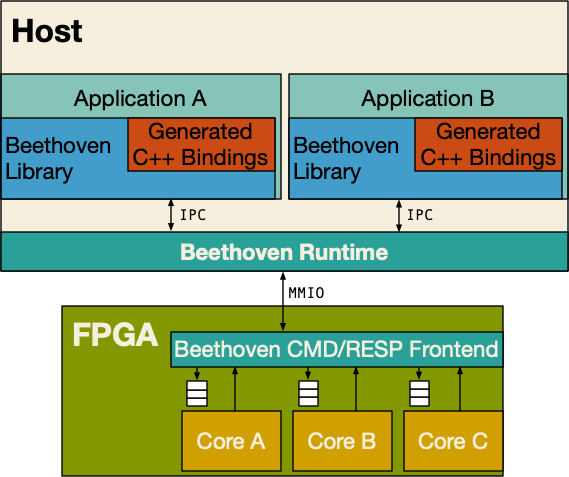
The software stack comprises a userspace library and a device-management runtime. The userspace library provides utilities for allocating accelerator-accessible memory regions and routines for sending Beethoven-compliant command/response messages to the accelerator. The library incorporates the hardware-generated C++ linkage into the programming environment, allowing the user to communicate with their accelerator using the same control signals exposed inside their RTL.
We'll start by looking at a simple example that continues from the hardware design we developed in the Beethoven Hardware stack section (link).
A Basic Example (cont'd)
Picking up from where we left off with our vector addition core, we had just built our hardware. With
your environment properly set up (having set your BEETHOVEN_PATH environment variable in your bashrc),
it should have generated your hardware modules in $BEETHOVEN_PATH/build/hw and your C++ linkages
in $BEETHOVEN_PATH/build/beethoven_hardware.h and $BEETHOVEN_PATH/build/beethoven_hardware.cc.
Testbench
The header should have a stub that looks like this:
namespace myVectorAdd {
        beethoven::response_handle<bool> vector_add(
            uint16_t core_id,
            beethoven::remote_ptr vec_a_addr,
            beethoven::remote_ptr vec_b_addr,
            beethoven::remote_ptr vec_out_addr,
            uint32_t vector_length);
};
To use our core, let's set up a new CMake project. Your CMakeLists.txt will go in the root directory
of your c++ directory and will look something like this.
cmake_minimum_required(VERSION 3.30)
project(vector_add)

find_package(beethoven REQUIRED)
set(CMAKE_CXX_STANDARD 17)

beethoven_build(vector_add
    SOURCES main.cpp)
If you've installed the Beethoven software library correctly, find_package should work correctly.
beethoven_build is a function that declares a new target in a similar way to add_executable.
We'll create a new c++ source file called main.cpp and insert the boilerplate:
#include <iostream>
#include <beethoven/fpga_handle.h>
#include <beethoven_hardware.h>

using namespace beethoven;
int main() {
  fpga_handle_t handle;

}
The fpga_handle_t is our way of communicating with our accelerator. Once it's been constructed
somewhere in your executable, you'll be able to call on your accelerator. First, let's look at the
arguments to our vector-add unit.
First, there's core_id. If we elaborated a multi-core accelerator, we can use this argument to
specify which core we want to execute our vector-add. Next, we have a few beethoven::remote_ptr
arguments for our vectors. When you use an Address type in a BeethovenIO, it will result in the
use of beethoven::remote_ptr in the c++ linkage.
remote_ptr is a smart pointer that we use for making allocations that are accessible from our
accelerator. It has shared_ptr semantics,
so you should not need to free it manually.The use of this
special type is necessary because some accelerators share the same address space with the host
CPU (ex. Zynq) whereas others have discrete address spaces (ex. AWS F2). We hide the implementation
details for managing these address spaces inside the pointer type.
To allocate a slice of memory that is accessible from your accelerator, the fpga_handle_t exposes
a malloc interface that behaves like a typical C malloc interfaces. The remote_ptr allocates
a slice of memory in the host address space. You can fetch this pointer using .getHostAddr(),
initialize the memory and use it like a normal memory allocation.
To transfer the allocation over to the accelerator-accessible space, we use
handle.copy_to_fpga().
fpga_handle_t handle;
int size_of_int = 4;
int n_eles = 32;
auto vec_a = handle.malloc(size_of_int * n_eles);
auto vec_b = handle.malloc(size_of_int * n_eles);
auto vec_out = handle.malloc(size_of_int * n_eles);

auto vec_a_host = (int*)vec_a.getHostAddr();
auto vec_b_host = (int*)vec_b.getHostAddr();
for (int i = 0; i < n_eles; ++i) {
    vec_a_host[i] = i + 1;
    vec_b_host[i] = i * 2;
}
handle.copy_to_fpga(vec_a);
handle.copy_to_fpga(vec_b);
Now, to call our accelerator we use the stub:
auto resp_handle = myVectorAdd::vector_add(0,
                                           vec_a,
                                           vec_b,
                                           vec_out,
                                           n_eles);
This returns a response handle. Although your accelerator is now executing, your host CPU can
continue working until you're ready to block and wait for your code to finish. Then, you
can copy your results back to host-accessible memory using handle.copy_from_fpga(...).
auto response = resp_handle.get()
handle.copy_from_fpga(vec_out);
If you want to check if your code has finished, but not block if it hasn't, then we also offer a try_get().
The response payload will be the struct specified by your accelerator core BeethovenIO if you
specified one. If you specified no response acknowledgement, .get() will throw an error.
Run your code
Now we have our testbench. To simulate our code, we'll start up the Beethoven Runtime.
- Simulation (Icarus Verilog)
- Simulation (VCS)
- Simulation (Verilator)
- AWS F2
- Zynq
git clone https://github.com/Composer-Team/Beethoven-Runtime
cd Beethoven-Runtime
bash setup_dramsim.sh
# this will build and run the simulator
make sim_icarus
git clone https://github.com/Composer-Team/Beethoven-Runtime
cd Beethoven-Runtime
bash setup_dramsim.sh
mkdir build
cd build
cmake .. -DCMAKE_BUILD_TYPE=Release -DTARGET=sim -DSIMULATOR=vcs
make -j
../scripts/build_vcs.sh

# run the runtime/simulator
./BeethovenTop
git clone https://github.com/Composer-Team/Beethoven-Runtime
cd Beethoven-Runtime
bash setup_dramsim.sh
mkdir build
cd build
cmake .. -DCMAKE_BUILD_TYPE=Release -DTARGET=sim -DSIMULATOR=verilator
make -j

# run the runtime/simulator
./BeethovenRuntime
git clone https://github.com/Composer-Team/Beethoven-Runtime
cd Beethoven-Runtime
mkdir build
cd build
cmake .. -DCMAKE_BUILD_TYPE=Release -DTARGET=fpga -DBACKEND=F2
make -j

# run the runtime
sudo ./BeethovenRuntime
git clone https://github.com/Composer-Team/Beethoven-Runtime
cd Beethoven-Runtime
mkdir build
cd build
cmake .. -DCMAKE_BUILD_TYPE=Release -DTARGET=fpga -DBACKEND=Kria
make -j

# run the runtime
sudo ./BeethovenRuntime
Each one of these simulation platforms should provide the same results. We recommend using either VCS or Icarus Verilog for simulation because they support tri-state logic (X, Z). We've also found instances where the Verilator compile time becomes prohibitively long (hours) whereas simulation + running for the others is a matter of a few minutes.
Once your simulator is running, compile and run your testbench binary like so.
# inside your c testbench directory
mkdir build
cd build
cmake ..
make -j
./vector_add
This will execute your accelerator core! Now you can quit the runtime and view the waveform for your execution.
In Verilator, CTRL+C is sufficient. For VCS and Icarus, CTRL+C to exit to the simulation
shell and run finish. This will ensure the waveform is properly flushed.
Beethoven Library
The library implements the integration between the user's testbench process and the simulator / FPGA management process. There are two basic interfaces available to the programmer:
- Sending commands/receiving responses
- Allocating Memory
Communicating with the Accelerator
We strongly recommend that any communication you have with your accelerator be over the generated C++ stubs from having
generated your hardware. If you've properly set up your environment, you should find them in $BEETHOVEN_PATH/build/beethoven_hardware.h.
Whenever you call your function stub with the parameters specified by the BeethovenIO interface from your hardware, it will
return a beethoven::response_handle<type_t>.
template<typename t>
class response_handle {
    t get();
    std::optional<t> try_get();
};
The response handle can be used to allow asynchronous execution of the host with the accelerator device. Calling
.get() blocks the host process while waiting for the accelerator response. .try_get() will query for a response
from the accelerator and will return a None-type if the response is not ready yet.
Allocating Memory
Beethoven exposes a typical malloc interface to the user. It should work identically on embedded platforms, discrete platforms,
and in simulation - the user should not need to change their usage of malloc based on the platform. The malloc interface is a
member of fpga_handle_t, which facilitates communication with the accelerator, and should be used like so.
using namespace beethoven;

int main() {
    fpga_handle_t handle;
    ...
    auto alloc = handle.malloc(64);
}
.malloc() will not only allocate space in the accelerator address space, but will allocate an associated space in the host
address space. The addresses to these spaces are accessible from the return type from malloc: remote_ptr.
remote_ptr is a smart pointer type that will free itself when no valid references to the allocation exist (equivalent to std::shared_ptr).
The host address is accessible via .getHostAddr() and the FPGA address is accessible via .getFpgaAddr(). Example:
using namespace beethoven;

int main() {
    fpga_handle_t handle;
    ...
    auto alloc = handle.malloc(64);

    void * host_allocation = alloc.getHostAddr();
    uint64_t fpga_allocation = alloc.getFpgaAddr();
}
In practice there is no reason to use .getFpgaAddr() because when you use the Address type inside the declaration of your hardware's
BeethovenIO interfaces, it will produce a C++ stub that directly takes in your remote_ptr object and extracts the FPGA address for you.
DMA Transfers
To move data between host and accelerator address spaces, use the handle.copy_to_fpga and handle.copy_from_fpga routines.
void copy_to_fpga(const remote_ptr &dst);
void copy_from_fpga(const remote_ptr &src);
These routines deduce from the generated hardware header how to instrument memory DMA between the host and accelerator. These routines are only really necessary on platforms with discrete accelerator/host memory spaces, but we think it's a good idea to instrument your code with these routines even if you don't need them to improve code portability across platforms.
Beethoven Runtime
When using the runtime over a real FPGA, the runtime manages all communication between host
processes and the device. It is responsible for moving over commands as well as polling the
FPGA for responses. The rate of this polling is configurable in the source file
src/response_poller.cc [link]
if you wish to increase or decrease the rate. By default, it is set to 10µs.
Building
- Simulation (Icarus Verilog)
- Simulation (VCS)
- Simulation (Verilator)
- AWS F2
- Zynq
git clone https://github.com/Composer-Team/Beethoven-Runtime
cd Beethoven-Runtime
bash setup_dramsim.sh
# this will build and run the simulator
make sim_icarus
git clone https://github.com/Composer-Team/Beethoven-Runtime
cd Beethoven-Runtime
bash setup_dramsim.sh
mkdir build
cd build
cmake .. -DCMAKE_BUILD_TYPE=Release -DTARGET=sim -DSIMULATOR=vcs
make -j
../scripts/build_vcs.sh

# run the runtime/simulator
./BeethovenTop
git clone https://github.com/Composer-Team/Beethoven-Runtime
cd Beethoven-Runtime
bash setup_dramsim.sh
mkdir build
cd build
cmake .. -DCMAKE_BUILD_TYPE=Release -DTARGET=sim -DSIMULATOR=verilator
make -j

# run the runtime/simulator
./BeethovenRuntime
git clone https://github.com/Composer-Team/Beethoven-Runtime
cd Beethoven-Runtime
mkdir build
cd build
cmake .. -DCMAKE_BUILD_TYPE=Release -DTARGET=fpga -DBACKEND=F2
make -j

# run the runtime
sudo ./BeethovenRuntime
git clone https://github.com/Composer-Team/Beethoven-Runtime
cd Beethoven-Runtime
mkdir build
cd build
cmake .. -DCMAKE_BUILD_TYPE=Release -DTARGET=fpga -DBACKEND=Kria
make -j

# run the runtime
sudo ./BeethovenRuntime
Memory Modeling
Beethoven hardware emits memory transactions using the AXI4 protocol. To accurately model DRAM latencies in our simulator
we implement a AXI4-DDR controller that models DDR using DRAMSim3.
DRAMSim3 allows us to model different memory technologies by simply changing the memory configuration input file.
By default we use the DDR4_8Gb_x16_3200.ini config that comes with DRAMSim, but you can change the configuration
by defining the DRAMSIM_CONFIG build variable for VPI-based builds or by starting the Verilator-based simulator
using ./BeethovenTop -dramconfig <your_config>.
Allocator Implementation
Discrete Device Allocator
When operating on a discrete device, Beethoven provides a thread-safe allocator implementation so that separate threads and processes can fully utilize the FPGA's memory space without relying on inter-process communication to synchronize allocations.
The allocator maintains allocation state entirely in the runtime process and stores nothing inside the FPGA memory. It is a slab-based allocator with 2MB slabs and a minimum allocation size of 4KB. Allocations of less than 4KB will not fault, but will incur external fragmentation.
Embedded Device Allocator
When the accelerator device shares the address space with the host CPU, the operating system needs
to know about the allocations that we make. Currently, we don't support virtual addressing on the
Zynq platforms, so we use Linux [hugepages]
to make physical memory allocations that are larger than 4KB. When running on a Zynq system,
Beethoven's malloc uses mmap to allocate the memory and then obtains the virtual to physical
mapping from the OS.
We provide a script here for pre-allocating hugepages on Zynq platforms.